How to Tie the Backward Knot (and Why It Feels Awkward)
The backward knot is the forward knot in a mirror, moving a string from right to left. Learn the steps, why it feels clumsy at first, and grips that help.
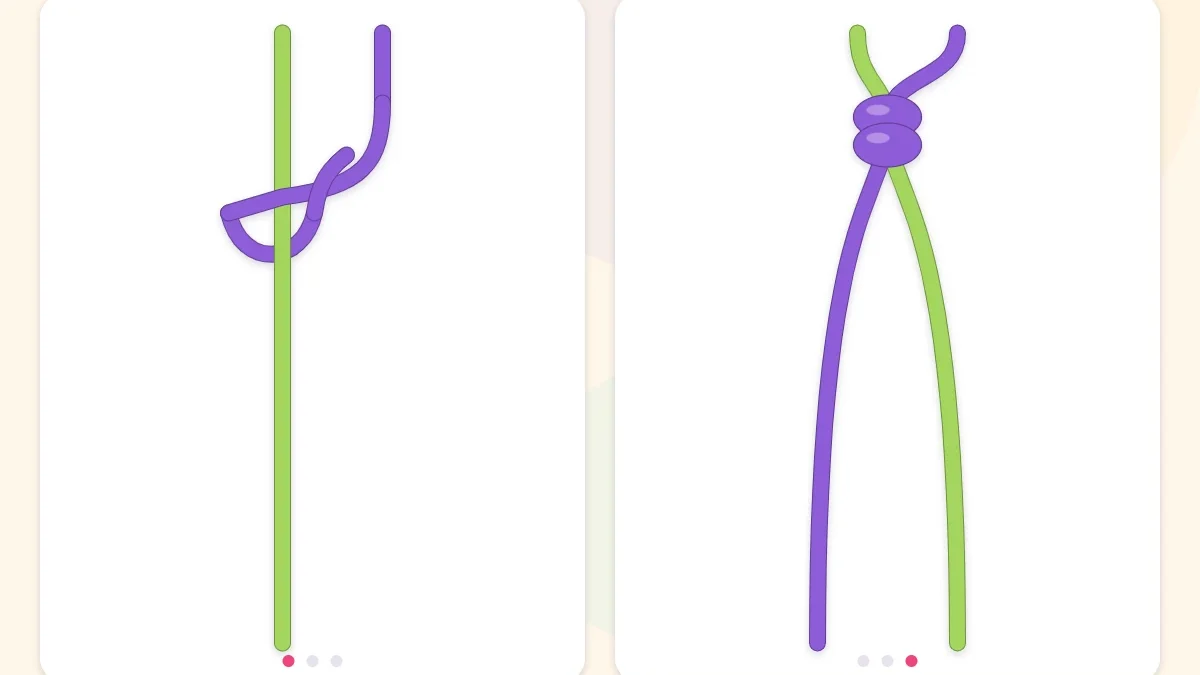
Tutorial at a glance
Materials
- Embroidery floss in 2 contrasting colors
- Scissors
- Tape or a clipboard
After the forward knot comes its mirror image. The backward knot uses the same two half hitches, tied from right to left instead of left to right, and it is the knot that lets a color travel back toward the left edge of a bracelet. It is no harder than the forward knot, yet almost everyone finds it clumsy at first. This guide covers the steps, the reasons it feels odd, and the hand positions that make it settle in faster.
How the Backward Knot Relates to the Forward Knot
Everything about the backward knot is the forward knot flipped left to right:
| Forward knot | Backward knot | |
|---|---|---|
| Working string starts | On the left | On the right |
| Shape you make | A “4” | A backward “4” |
| Direction of pull | Up and to the right | Up and to the left |
| Working string ends | On the right | On the left |
| Chart arrow | Down and to the right | Down and to the left |
The rules that do not change are the important ones. It is still two half hitches, both tied with the same string around the same neighbor, and the knot still takes the color of the working string.
How to Tie a Backward Knot
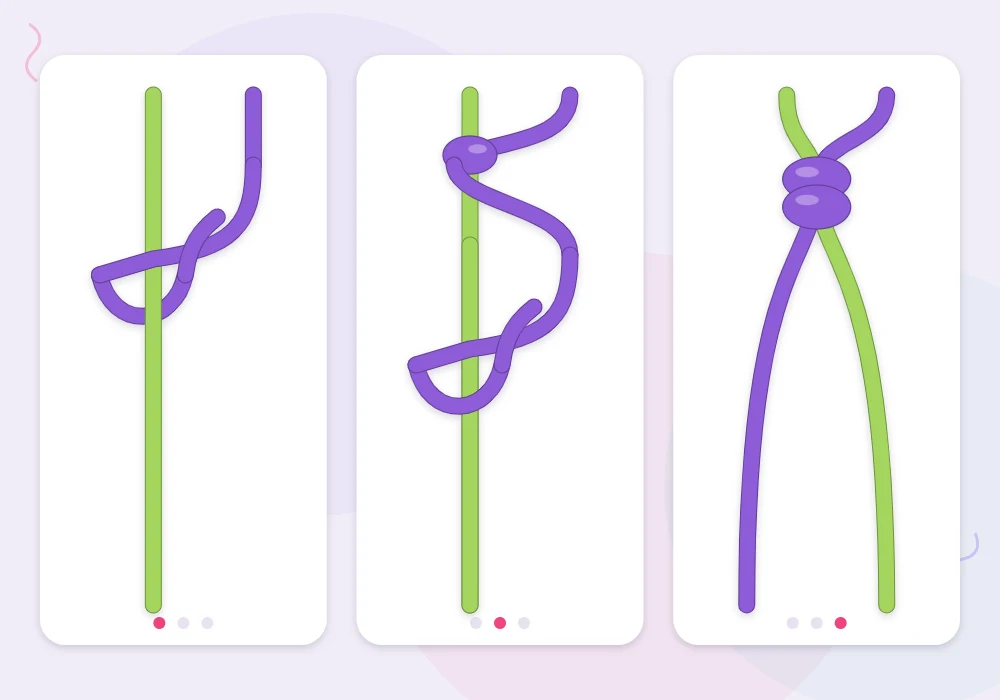
Set up two practice strings about 30 in (76 cm) long, knotted together at the top and taped down. This guide uses violet and lime green. Put lime on the left and violet on the right. Violet is the working string.
- Hold the lime string taut. Pull it straight down toward you and keep it still.
- Make a backward “4”. Lay the violet string across the top of the lime string so its end points to the left. The two strings form a 4 seen in a mirror.
- Go under and through. Bring the violet end under the lime string and up through the opening.
- Pull up to the top. With lime still taut, pull violet up and slightly to the left until the wrap sits against the starting knot.
- Repeat. Make a second backward 4 with violet over lime, pass it under and through, and pull it snug beneath the first half hitch.
- Check. There should be one violet bump, and the violet string should now hang to the left of the lime string.
Why the Backward Knot Feels Awkward
The motion is not more difficult. It is simply unpracticed, and it competes with a habit you have just built.
- Your hands have learned one direction. After a few dozen forward knots, your fingers form the regular 4 without being asked. The backward knot needs the same movement mirrored, and hands drift back to what they know.
- The opening is on the other side. Your eyes look for the gap of the 4 where it used to be, which makes the pass-through feel hidden.
- The pull goes the other way. Pulling up and to the left uses your wrists differently, so tension comes out uneven until you adjust.
- The two half hitches can get mixed. It is easy to tie the first one backward and then slip into a forward motion for the second, which produces a different knot entirely.
All of this fades with repetition. Expect the first ten or twenty backward knots to be slow, and judge your progress after that.
Hand Positions That Help
There is no single correct grip. Try these and keep whichever gives you the most even knots.
Mirror your forward-knot grip
Whatever each hand did for the forward knot, give that job to the other hand. If one hand held the holding string and the other made the 4, swap them. This keeps the logic identical and is the option most people settle on.
Anchor the holding string on a finger
Wrap the lime holding string once around the little finger or ring finger of the hand on that side and pull it down. The string stays taut on its own, and your thumb and index finger are free to help guide the working string through the opening.
Turn the work slightly
If you use a clipboard, rotate it a little so the bracelet points toward your tying hand. A small change of angle can make the backward 4 easier to see and the upward pull more natural.
Tip
Before each knot, lay the working string in the backward 4 and pause for a second. Checking the shape before you pass the end through prevents most wrong-direction knots.
Tension and Common Slips
- Wrong color showing: the holding string went slack and the knot flipped. Keep it straight and taut through both half hitches.
- The working string ends on the right: the second half hitch was tied forward. Untie it and repeat the backward 4.
- Backward knots look bigger or looser than forward knots: your weaker direction is pulling with less force. Slow down and slide each half hitch fully to the top before tightening.
- Knots sit low: you are pulling sideways. Pull up and to the left, toward the previous row.
Watch out
Do not compensate for the awkward feeling by pulling extra hard. Over-tight backward knots on one side and normal forward knots on the other will make a bracelet lean or curl.
Where You Will Use It
The backward knot appears as soon as a pattern is symmetrical. In a chevron friendship bracelet, the left outer string ties forward knots toward the center while the right outer string ties backward knots toward the center, and the two meet in a single center knot. If your backward knots match your forward knots in size, the point of the V comes out sharp and centered.
Backward knots also make diagonal stripes that lean the opposite way, and one backward half hitch is the first half of the backward-forward knot used on right-hand edges.

A Simple Drill for Both Directions
With your two practice strings, tie one forward knot and then one backward knot using the same working string. It travels to the right, then returns to the left, leaving two bumps of the same color. Repeat ten times and compare the pairs. When you cannot tell which bump was tied in which direction, your backward knot is ready for a real pattern. For a refresher on how this knot fits with the others, see the overview of the four basic knots.
Frequently asked questions
What is the difference between a forward knot and a backward knot?
Direction. A forward knot moves the working string from left to right with a 4 shape, and a backward knot moves it from right to left with a mirrored 4.
Why is the backward knot harder than the forward knot?
It is not harder, only less practiced. Your hands have learned the forward motion, so the mirrored version feels clumsy until you have repeated it a few dozen times.
Which hand should hold the string for a backward knot?
Either works. Many people simply swap the jobs their hands had for the forward knot, and others anchor the holding string around a finger to keep it taut.
Where is the backward knot used?
On the right half of chevron rows, in diagonal stripes that lean the opposite way, and as the first half of the backward-forward knot.


