Diamond Friendship Bracelet Pattern
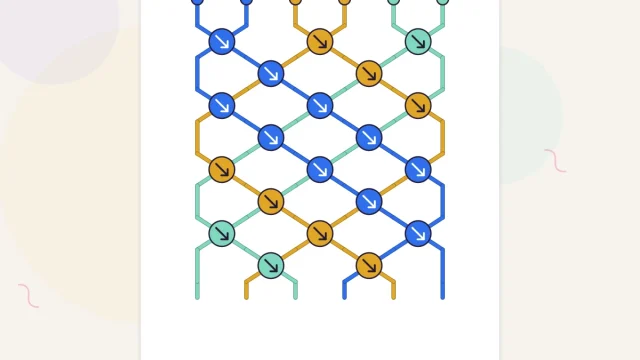
This diamond friendship bracelet pattern joins a chevron row and a reverse chevron row into navy X shapes, then fills each diamond with a ring of color around a yellow center.

Tutorial at a glance
Materials
- Embroidery floss in 4 colors
- Scissors
- Ruler or tape measure
- Tape or a clipboard
- A pin for undoing knots
A diamond friendship bracelet pattern looks like a big jump from stripes and chevrons, yet it is made from rows you may already know. A chevron row draws a V. A reverse chevron row draws an upside-down V. Put them together and they outline a diamond, with a handful of extra knots filling the middle. This tutorial uses eight strings and an original four-color layout: navy lines that cross in X shapes, with diamonds that alternate between aqua and coral around a yellow center.
How a diamond is built
Every repeat of the pattern has four parts:
- An inward row. The outline color travels from both edges to the middle, exactly as in a chevron friendship bracelet. This is the bottom of one diamond.
- Edge triangles. A few knots fill the corners beside the X.
- An outward row. The outline color travels from the middle back to the edges, as in a reverse chevron bracelet. This is the top of the next diamond.
- The diamond fill. Nine knots fill the space the outline has opened.
The inward row that follows closes the diamond, and the cycle starts again.
Strings and color order
Cut two strings each of navy, aqua, sun yellow and coral in 6-strand embroidery floss, used whole. The navy pair ties every outline knot, so it is used up fastest: cut navy at about 46 in (117 cm) and the other six strings at about 36 in (91 cm). Tie all eight together, anchor the top, and arrange them from left to right: navy, aqua, sun, coral, coral, sun, aqua, navy.
The steps below describe the left side. The right side is always the mirror image: where the left side uses a forward knot, the right side uses a backward knot, and the other way around.
The first X
- Inward row. Tie forward knots with the left navy string over aqua, sun and coral. Tie backward knots with the right navy string over aqua, sun and coral. Join the two navy strings with one forward knot. Order: aqua, sun, coral, navy, navy, coral, sun, aqua.
- Edge triangles. With the left aqua string, tie forward knots over sun and coral, then stop before navy. With the left sun string, now on the outside, tie one forward knot over coral. Mirror on the right with backward knots. Order: coral, sun, aqua, navy, navy, aqua, sun, coral.
- Outward row. Do not tie a new center knot, because the one from step 1 is the crossing point of the X. Take the left navy string and tie backward knots over aqua, sun and coral, out to the left edge. Take the right navy string and tie forward knots out to the right edge. Order: navy, coral, sun, aqua, aqua, sun, coral, navy.
The navy knots now form an X, with a small aqua and yellow triangle tucked into each side. Below the X, six strings hang unknotted between the two navy edges. That open space is the first diamond.

Fill the diamond
The fill is a small aqua ring around one yellow knot, worked with the six middle strings: coral, sun, aqua, aqua, sun, coral.
- Tie the two aqua strings together with a forward knot. This is the top of the ring.
- With the left aqua string, tie a backward knot over sun. With the right aqua string, tie a forward knot over sun. The aqua strings have each moved one place outward.
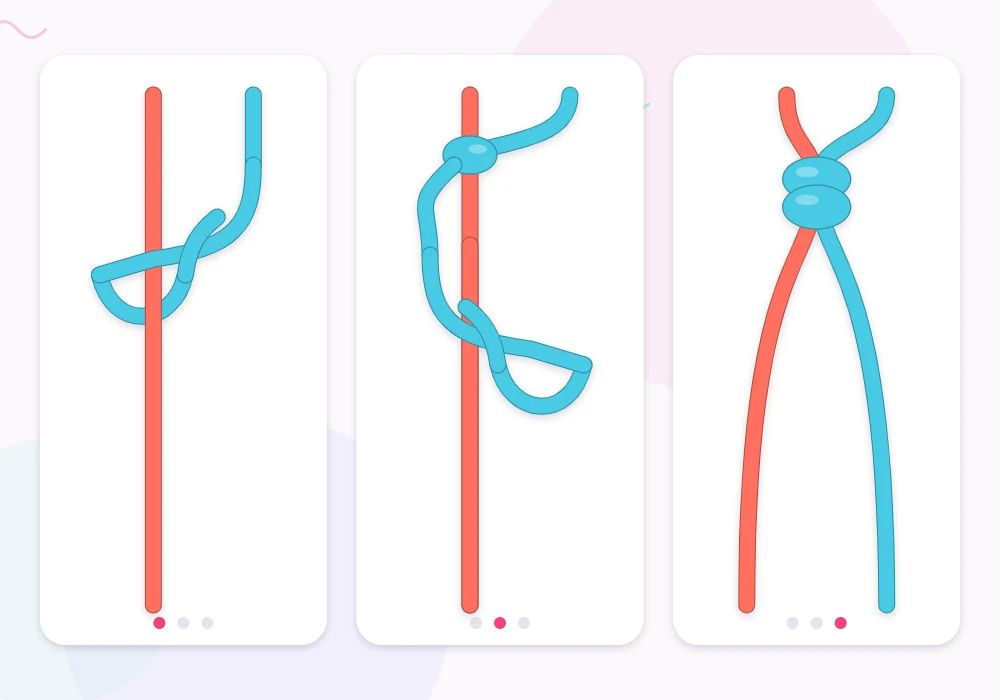
- Now the aqua strings must turn around. With the left aqua string, tie a backward-forward knot over coral. With the right aqua string, tie a forward-backward knot over coral. Each aqua string makes a knot at the widest point of the diamond and stays where it was.
- Tie the two sun strings in the middle together with a forward knot. This is the center of the diamond.
- With the left aqua string, tie a forward knot over sun. With the right aqua string, tie a backward knot over sun. The aqua strings are back in the middle.
- Tie the two aqua strings together with a forward knot to close the ring.
That is nine knots: one, two, three across the widest row, two, one. The order is unchanged from the start of the fill: navy, coral, sun, aqua, aqua, sun, coral, navy.
Tip
The coral strings beside the navy edges are only knotted over once during this fill. Keep them straight and gently taut while you work, so they do not bow outward and widen the diamond.
Close the diamond and start the second repeat
Closing the diamond is simply the next inward row. Tie forward knots with the left navy string over coral, sun and aqua, mirror on the right, and join the navy pair in the middle. Order: coral, sun, aqua, navy, navy, aqua, sun, coral.
The second repeat uses the same moves, but the strings have changed places, so the colors change with them:
- Edge triangles. Left coral ties forward knots over sun and aqua; left sun then ties one forward knot over aqua. Mirror on the right. The triangles are coral and yellow this time.
- Outward row. Navy travels from the middle to both edges, with no new center knot. Order: navy, aqua, sun, coral, coral, sun, aqua, navy. This is the order you started with.
- Diamond fill. Work the same nine knots with the coral pair as the ring: join, outward over sun, turning knots over aqua, yellow center knot, inward over sun, join.
- Inward row. Navy closes the diamond. The strings are now in the same order as after step 1 of the first X, so continue from the aqua edge triangles.
The bracelet therefore alternates: an aqua diamond, a coral diamond, an aqua diamond, each with a yellow dot in the middle and navy lines crossing between them.

Changing the center fill color
The layout is easy to redesign once you see which position controls which part of the pattern:
- The outside pair at setup is the outline. A dark or strongly contrasting color keeps the X shapes crisp.
- The third pair from the edge is the center dot of every diamond, and also the tip of every edge triangle.
- The second and fourth pairs take turns as the ring. Choose two similar shades for diamonds that nearly match, or two contrasting ones for a clear alternation.
For a solid diamond with no dot, use the same color for the ring pair and the center pair.
Common trouble spots
- A hole at a side corner of the diamond. The turning knot was skipped or tied as a plain knot, which sends the ring string off course.
- A blunt top or bottom point. The joining knot of the ring is loose. Tighten both half hitches.
- A lump at the X. A second center knot was added before the outward row.
- Diamonds of different sizes. Tension changed between repeats. Pull the outline knots with the same firmness on inward and outward rows.
Watch out
Always finish the bracelet on an inward row, so the last diamond is closed. Stopping after a fill leaves six strings with nothing holding them at the bottom edge.
Allow about 2.5 to 3.5 hours for a first diamond bracelet. The rows go more slowly than a chevron at first, but the four-part rhythm becomes familiar within two or three repeats.
Frequently asked questions
Is the diamond pattern hard for beginners?
It is an intermediate pattern. It is manageable once you are comfortable with the chevron and can tie all four basic knots, including the two turning knots.
Why is there a gap in the middle of my diamond?
The space between an outward row and the next inward row has to be filled with its own knots. If the fill is skipped or cut short, the middle strings hang loose.
How many strings do I need for a diamond bracelet?
This pattern uses eight strings in four colors, arranged in mirrored order. Larger diamonds are possible with more strings, but they need more fill knots.
Which string should be longer in a diamond pattern?
The outline pair, which starts on the outside, ties the most knots. Cutting those two strings about 10 in (25 cm) longer than the others is a safe margin.