How to Read Friendship Bracelet Patterns
A knot chart tells you which strings to use, which knot to tie and what color shows. Learn the strings, circles, arrows and staggered rows, plus ways to keep your place.
Tutorial at a glance
Materials
- A printed or on-screen knot chart
- Embroidery floss in the chart colors
- A sticky note or strip of paper
- A pencil
A knot chart packs an entire bracelet into one small diagram, and at first glance it can look like a tangle of lines and dots. The system behind it is simple, though. Once you know how to read friendship bracelet patterns, any chart that follows the same convention tells you three things for every knot: which two strings to use, which knot to tie, and what color will show.
What a Knot Chart Shows
Charts on this site follow one convention:
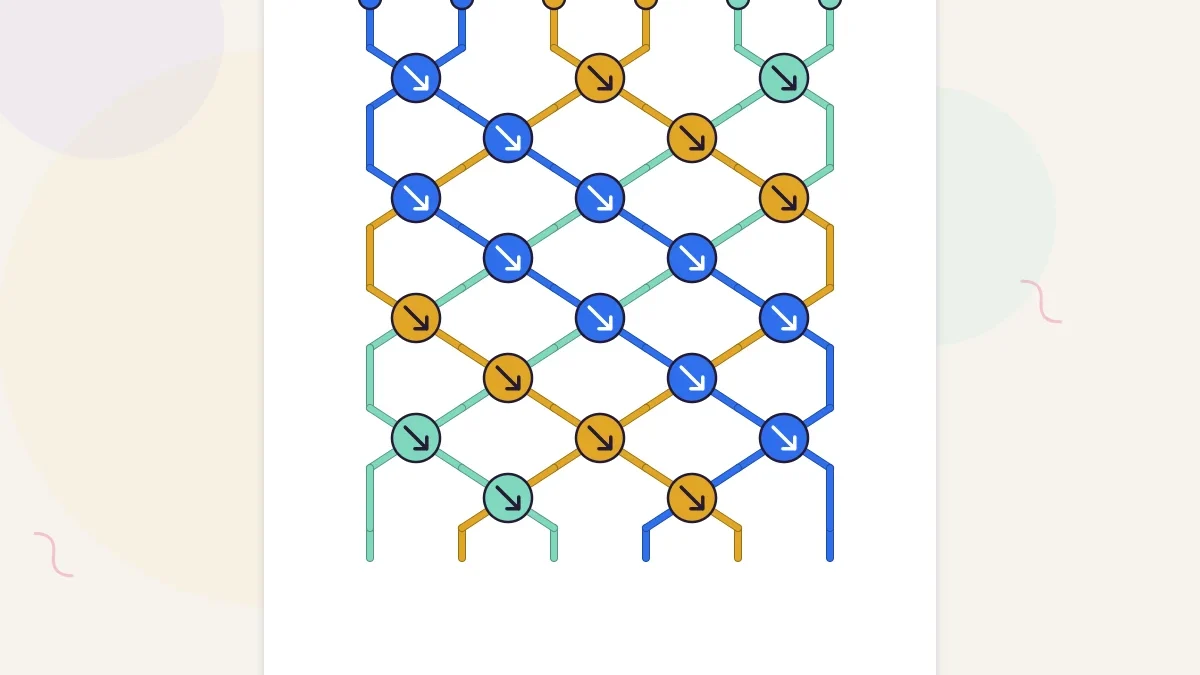
- Strings enter at the top. Each line coming down from the top edge is one string, drawn in its own color, in the order you set them up from left to right.
- Each circle is a knot. A circle sits where two strings meet.
- The circle’s color is the knot color. It matches whichever of the two strings does the tying.
- The arrow inside the circle is the knot type. It tells you which of the four knots to tie.
Below each circle, the two strings continue downward to the next knots they take part in. Reading a chart is mostly a matter of following those lines.

Start With the Strings at the Top
Before you tie anything, read the top row of the chart from left to right and write down the colors. That list is your setup. Count how many strings there are and how many of each color, cut them, and lay them out in exactly that order.
The setup order matters more than anything else on the chart. If two strings are swapped at the start, every row after it will show colors in the wrong places even when all your knots are correct. A diagonal design such as the candy stripe friendship bracelet makes a good first chart, because it has few strings and uses one kind of knot.
The Four Arrows
Each arrow shows the path the working string takes. If the knots themselves are new to you, start with the overview of the four basic friendship bracelet knots.
| Arrow in the circle | Knot | String that ties | After the knot |
|---|---|---|---|
| Down and to the right | Forward | Left string | The strings trade places |
| Down and to the left | Backward | Right string | The strings trade places |
| Right, then back to the left | Forward-backward | Left string | The strings stay where they were |
| Left, then back to the right | Backward-forward | Right string | The strings stay where they were |
Notice that the arrow and the circle color give you the same information twice. A down-right arrow means the left string ties the knot, so the circle should be the color of the left string. That built-in double check is one of the most useful features of a chart.
Rows: Odd and Even
Knots are arranged in horizontal rows, and the rows are staggered like bricks in a wall.
- Odd rows (first, third, fifth) pair the strings starting from the left edge: strings 1 and 2, strings 3 and 4, strings 5 and 6, and so on.
- Even rows (second, fourth, sixth) shift over by one: strings 2 and 3, strings 4 and 5, and so on.
With an even number of strings, this means the two outermost strings sit out every even row, and an even row has one knot fewer than an odd row. With an odd number of strings, every row has the same number of knots, and the string left out switches sides from row to row. A string that skips a row simply hangs straight down the edge until the next row picks it up.
“String 1” always means the string that is on the far left right now, not the one that started there. Positions are counted fresh on every row.
Tip
Knots in the same row never share a string, so you may tie them in any order. Left to right is the easiest habit. For mirrored designs, many people prefer to work from both edges toward the middle.
Reading One Knot From Start to Finish
- Find the two strings. Follow the lines that enter the circle from above and pick up those two strings on your bracelet.
- Check the colors. Compare them with the chart. If your two strings do not match the two lines, something went wrong in an earlier row.
- Read the arrow. It tells you the knot. In a forward knot, for example, the left string wraps the right string twice and ends up on the right.
- Tie the knot and confirm that the bump is the color of the circle.
- Let the strings fall where the chart shows them leaving: swapped for a forward or backward knot, unchanged for the two turning knots.

Repeats: When the Chart Runs Out
Most charts show a single repeat of the design rather than the whole bracelet. When you reach the bottom row, compare the order of the strings leaving the chart with the order at the top. If they match, go straight back to the first row and start again. Keep repeating until the bracelet is long enough for your wrist.
In a chevron friendship bracelet, one V of each color forms a full repeat, and the strings return to their mirrored starting order once every color has taken its turn. Some designs need more than one pass through the chart before the starting order comes back, which is normal. Just continue reading from the top with the strings in whatever order they are in.

Keeping Your Place
- Cover what you have not done. Lay a sticky note or a strip of paper under the row you are working on and move it down as you go.
- Mark finished rows. On a printed chart, a pencil tick beside each completed row takes two seconds and saves a lot of recounting.
- Stop at the end of a row or repeat. Stopping in the middle of a row is how most lost places happen.
- Check the string order often. After every row, your loose strings should match the colors between that row and the next on the chart.
- Secure the strings when you pause. Tape them down in order so they are not shuffled when you come back.
Watch out
If a circle’s color cannot be made with the two strings in your hand, do not tie it anyway and hope it works out. The error is above you, usually within the last row or two. Find it and unpick back to it before continuing.
Frequently asked questions
What do the arrows mean in a friendship bracelet pattern?
They name the knot. Down-right is a forward knot, down-left is a backward knot, right then back left is a forward-backward knot, and left then back right is a backward-forward knot.
What do the circle colors mean?
The color of a circle is the color the finished knot will show, which is always the color of the string that does the tying.
Why do even rows have fewer knots?
Rows are staggered. With an even number of strings, the two outer strings sit out the even rows, so those rows have one knot fewer.
What do I do when I reach the bottom of the chart?
Go back to the first row and repeat the chart with the strings in their current order until the bracelet is long enough.