Candy Stripe Friendship Bracelet: The Classic First Project
A row-by-row candy stripe tutorial using eight strings and only the forward knot, with an original tangerine, aqua, cobalt and cream layout and tips for keeping the diagonal stripes even.

Tutorial at a glance
Materials
- Embroidery floss in tangerine, aqua, cobalt and cream
- Scissors
- Ruler or tape measure
- Tape or a clipboard
The candy stripe friendship bracelet is the pattern most people learn first, and it earns that place: one knot, one direction, and diagonal stripes that appear without any counting. Every row is the same move repeated across the strings. This tutorial uses eight strings in four colors, arranged so that two thin cream lines separate three bolder stripes.
How the candy stripe works
All the strings hang side by side. The leftmost string becomes the working string and ties a forward knot around each of the other strings in turn, traveling from the left edge to the right edge. That is one row, and it leaves a slanted line of knots in the working string’s color. The string that is now on the far left takes over and does exactly the same. Because each string crosses the whole band before the next one starts, the colors stack up as diagonal stripes that slope down toward the right.
The only skill required is the forward knot: two half hitches tied with the working string around its right-hand neighbor. If that motion is new, the step-by-step forward knot guide covers hand positions and tension in detail.
Materials and the four-color layout
This layout uses a warm color, two blues and a pale neutral. The cream strings are placed singly, so they knot up as thin lines between the wider stripes.
| Position (left to right) | Color | Stripe it makes |
|---|---|---|
| 1 and 2 | Tangerine | Wide stripe, two rows |
| 3 | Cream | Thin line, one row |
| 4 and 5 | Aqua | Wide stripe, two rows |
| 6 and 7 | Cobalt | Wide stripe, two rows |
| 8 | Cream | Thin line, one row |
Aqua and cobalt sit next to each other with no divider, which gives a soft two-tone blue stripe. The cream lines then frame the tangerine on both sides once the pattern repeats.
Cut two strings of each color, each about 36 in (91 cm) long. All eight strings do the same amount of work in a candy stripe, so they can all be the same length. For other wrist sizes or a loop start, see how to measure friendship bracelet string.
Set up the strings
- Hold all eight strings together with the ends even and tie one overhand knot about 3 in (8 cm) from the top.
- Tape the short tail to a table, or clamp it under a clipboard clip, so the knot cannot slide.
- Spread the strings flat in the order from the table: tangerine, tangerine, cream, aqua, aqua, cobalt, cobalt, cream.
Knot the first rows
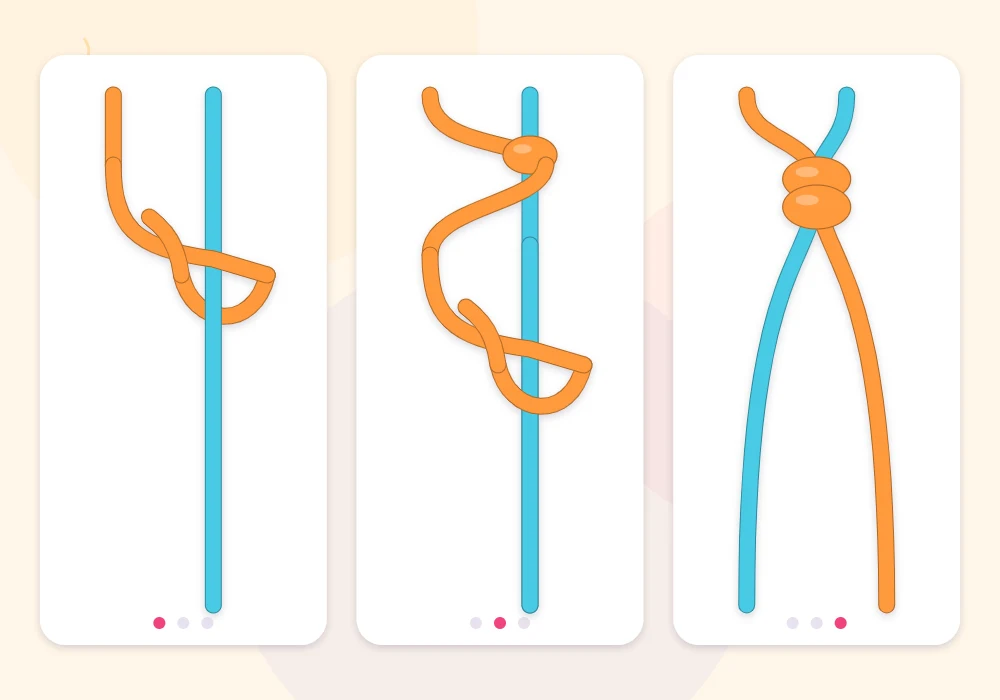
- First knot. Pick up the leftmost tangerine string. Lay it over the second string in a “4” shape, pass it under and up through the opening, and pull the loop up to the starting knot. Repeat on the same string. The working string is now in second place.
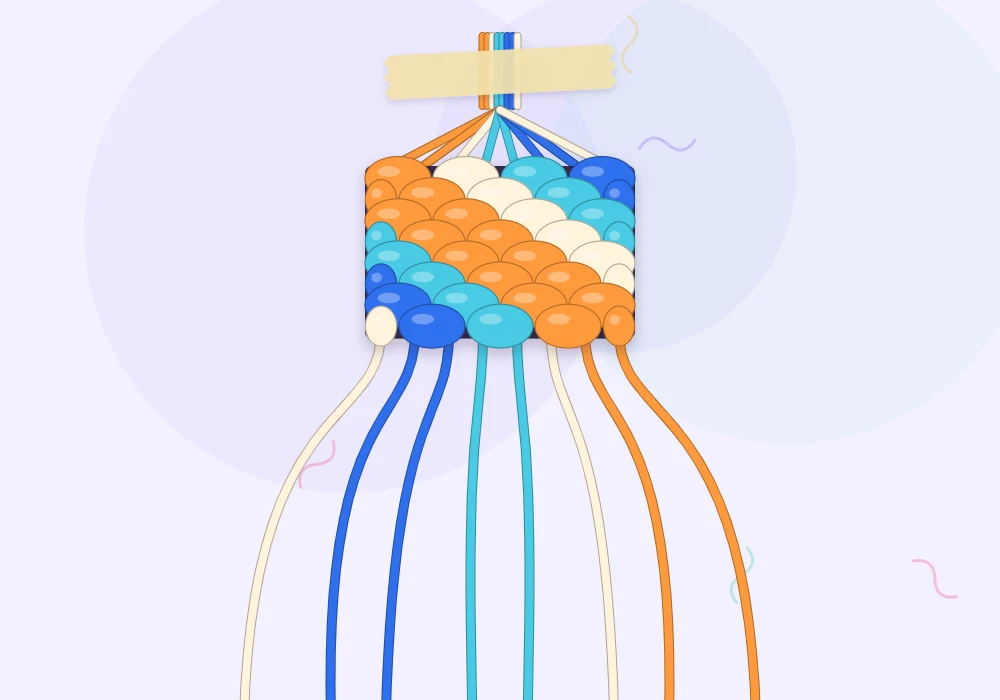
- Finish the row. Tie a forward knot around the next string to the right, then the next, until the working string has knotted around all seven others and hangs at the far right. Row one is done: seven tangerine knots in a slanted line.
- Second row. The other tangerine string is now on the far left. Use it to tie seven forward knots across, snugging each one up against the row above.
- Third row. The leftmost string is cream. Knot it across in the same way to make the first thin line.
- Keep going. Aqua, aqua, cobalt, cobalt, cream. After eight rows every string has crossed once and the strings hang in their original order, ready to repeat.
Tip
When two strings of the same color sit side by side, it is easy to pick up the wrong one. Before each row, comb the strings flat with the fingers and take whichever string is physically farthest left, without looking at its color.
Keep the stripes even
Uneven candy stripes almost always trace back to tension, and the fix is the same each time.
- Hold the neighbor string taut and straight down while the working string wraps around it. If the neighbor goes slack, the two strings swap roles and the knot shows the wrong color.
- Slide each half hitch all the way up before tightening. A knot tightened halfway leaves a gap that shows as a pale dot of bare string.
- Pull the first knot of a row gently. Yanking it draws the left edge inward and gives the band a wavy outline.
- Use the same pull on both half hitches. A firm first hitch and a loose second one makes lumpy knots.
The band will lean and may spiral slightly while it hangs from the tape. That is normal for a pattern in which every knot pulls the same way, and it relaxes when the finished bracelet is pressed flat.
Watch out
Count two half hitches for every knot. Tying only one is the most common beginner slip: the row looks fine at first, then loosens and lets the next row sink into it.
Reading the pattern as a chart
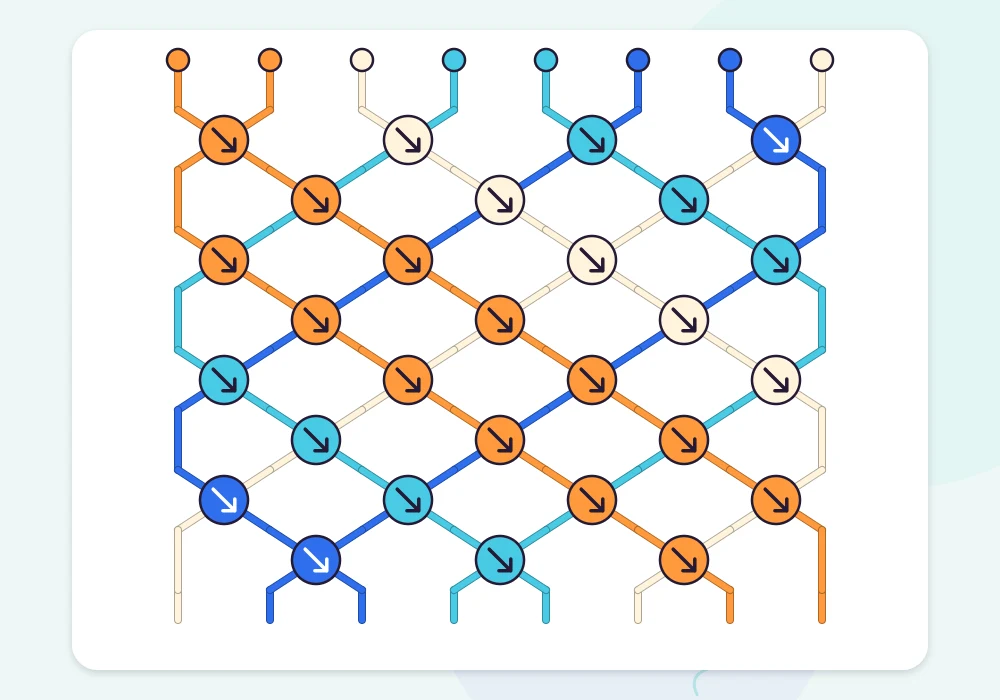
On a knot chart, a candy stripe looks like rows of circles that all carry the same arrow pointing down and to the right, the symbol for a forward knot. Each circle takes the color of the string entering from its upper left. Seeing this simple case on paper makes more complex charts easier to follow later.
Finish and wear it
Knot until the patterned section reaches about 6 in (15 cm), or until it wraps around the wrist with a finger-width gap between the ends. An adult bracelet in this layout needs roughly nine to eleven repeats, depending on how tightly the knots are pulled. Plan on about 2-3 hours for a first try.
Stop at the end of a full repeat if possible, so the bracelet begins and ends on the same color. Then tie all eight strings in an overhand knot tight against the last row. The loose ends on both sides can be braided into ties, and how to end a friendship bracelet shows the neatest ways to do it.
Change the look without changing the knot
The layout is the only thing that separates one candy stripe from another. Three strings of one color in a row make a broad band, a single string makes a pinstripe, and six strings in six colors make a rainbow. Once the basic version feels easy, the guide to diagonal stripe bracelet patterns explores uneven widths, accent lines and stripes that lean the other way.
Frequently asked questions
Which knot does a candy stripe bracelet use?
Only the forward knot. The leftmost string ties forward knots across every other string, and then the new leftmost string repeats the row.
How many strings are needed for a candy stripe bracelet?
Six to eight strings make a comfortable width. The number of strings also sets the length of one pattern repeat, since each string knots one row.
Why does a candy stripe bracelet twist or curl?
Every knot pulls in the same direction, so the band naturally leans and can spiral while it is being made. Keeping tension moderate and pressing the finished bracelet flat reduces it.
Can the stripes slant the other way?
Yes. Start each row with the rightmost string and tie backward knots across to the left, and the stripes slope down toward the left.


